NetHunter : CAN Arsenal
EXPERIMENTAL VERSION
This Documentation may be updated.
Description
CAN-Arsenal is used to communicate with CAN Bus for testing, diagnostics or car hacking.
Why?
By porting my Samsung Galaxy S9 kernel to Nethunter, i was looking yesimxev youtube video. I noticed that he was enabling CAN support, and at this moment this project started.
I’m starting to learn how CAN Bus work, and decided to make a tab for this usage. Bellow you can find the kernel change needed, and the documentation how CAN Arsenal work.
My Kernels
- Samsung Galaxy S9 - Lineage OS 20 Nethunter Kernel
- Samsung Galaxy S10 - Lineage OS 21 Nethunter Kernel
- Samsung Galaxy S10 - Lineage OS 22.1 Nethunter Kernel
Official Documentation
Table of Contents
- Prerequisite - Kernel Modification
- CAN Arsenal - Documentations
- Resource
- Credits
Prerequisite - Kernel Modification
Configuring the kernel - CAN Arsenal
CAN support will be needed for CAN Arsenal usage. Note that this documentations may be updated a lot since CAN Arsenal is in Experimental Version.
In section “Networking support”:
- Select “CAN bus subsystem support”
- Select “Network physical/parent device Netlink interface”

Under “CAN bus subsystem support —>”
- Select “Raw CAN Protocol (raw access with CAN-ID filtering)”
- Select “Broadcast Manager CAN Protocol (with content filtering)”
- Select “CAN Gateway/Router (with netlink configuration)”
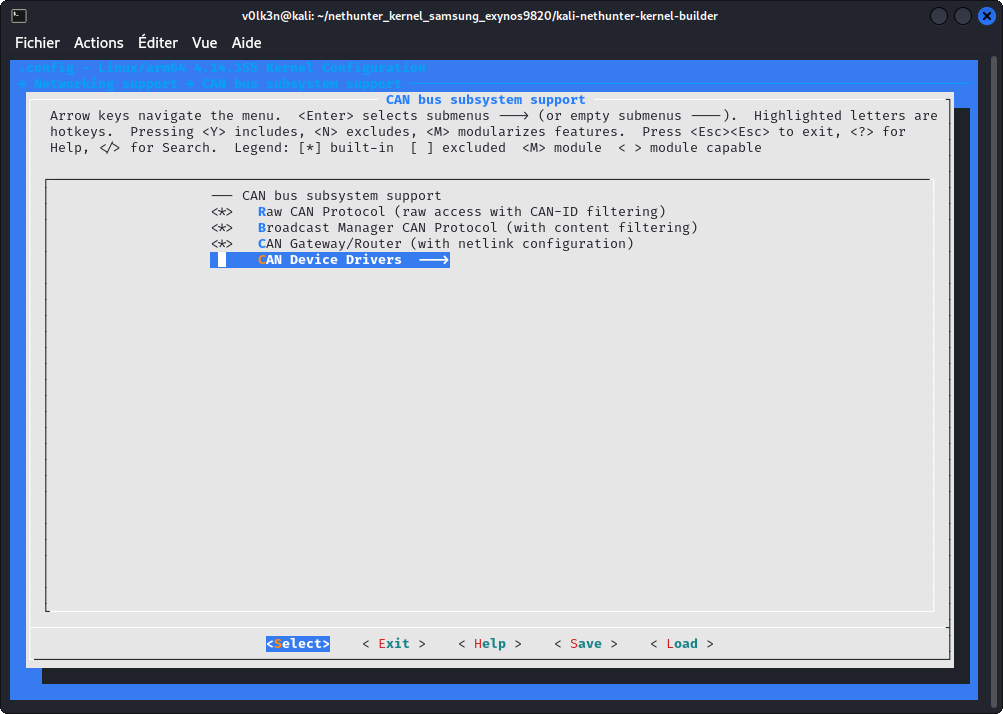
Under “CAN Device Drivers —>”
- Select “Virtual Local CAN Interface (vcan)”
- Select as module (M) “Serial / USB serial CAN Adaptors (slcan)”
- Select “Platform CAN drivers with Netlink support”
- Select “CAN bit-timing calculation”
- Select “Enable LED triggers for Netlink based drivers”
Optionally you may also :
- Select “Aeroflex Gaisler GRCAN and GRHCAN CAN devices”
- Select “Xilinx CAN”
- Select “Bosch C_CAN/D_CAN devices”
- Select “Bosch CC770 and Intel AN82527 devices”
- Select “IFI CAN_FD IP”
- Select “Bosch M_CAN devices”
- Select “Philips/NXP SJA1000 devices”
- Select “Softing Gmbh CAN generic support”

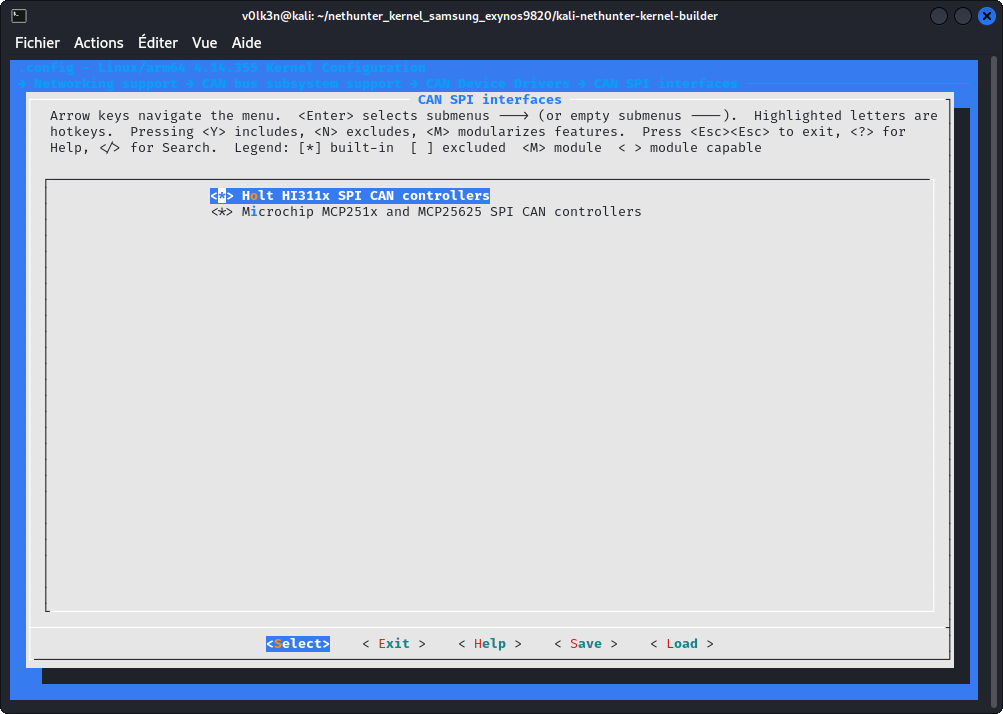
Under “CAN SPI interfaces —>”
- Select “Holt HI311x SPI CAN controllers”
- Select “Microchip MCP251x SPI CAN controllers”
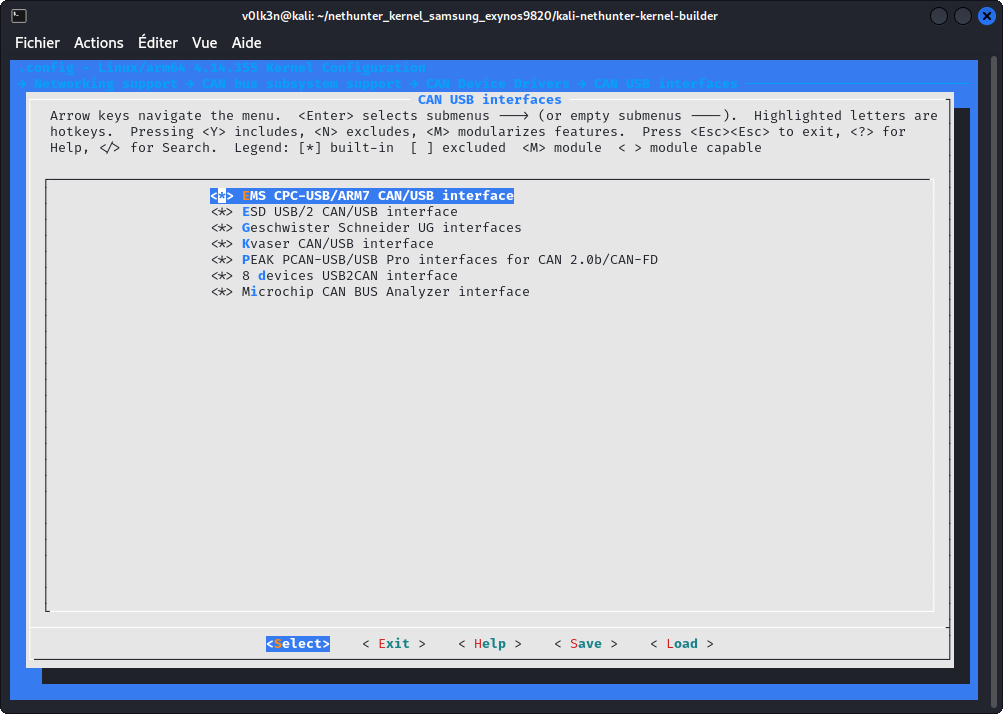
Under “CAN USB interfaces —>”
- Select “EMS CPC-USB/ARM7 CAN/USB interface”
- Select “ESD USB/2 CAN/USB interface”
- Select “Geschwister Schneider UG interfaces”
- Select “Kvaser CAN/USB interface”
- Select “PEAK PCAN-USB/USB Pro interfaces for CAN 2.0b/CAN-FD”
- Select “8 devices USB2CAN interface”
In Section “Networking Support”
Under “Networking options”
- Select “Virtual Socket protocol”
- Select “NETLINK: socket monitoring interface”

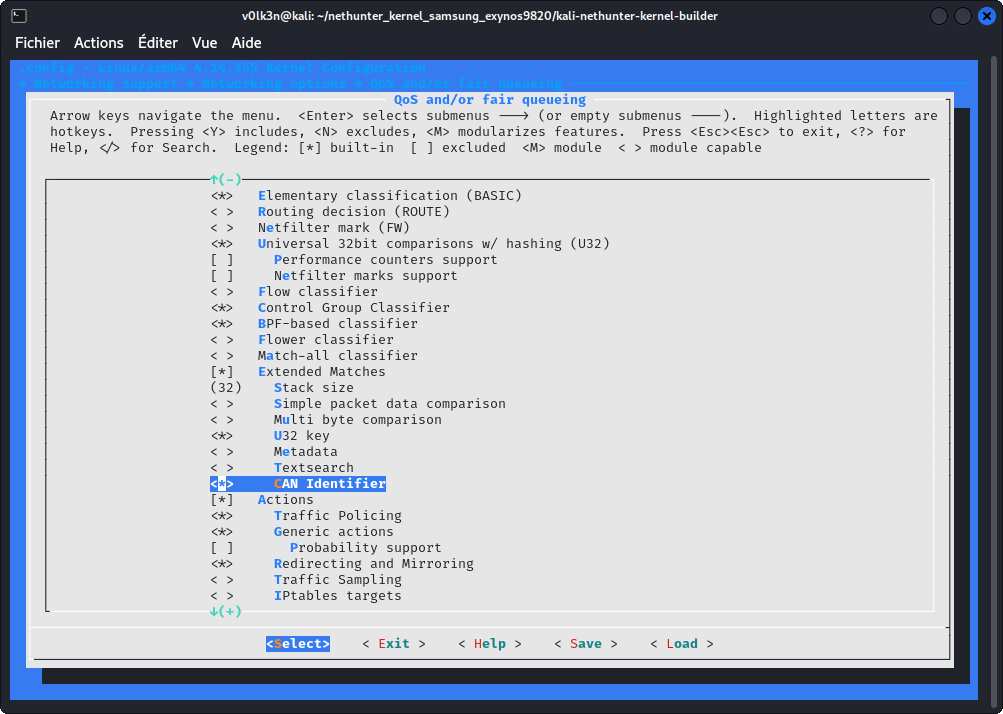
Under “QoS and/or fair queueing”
- Select “CAN Identifier”
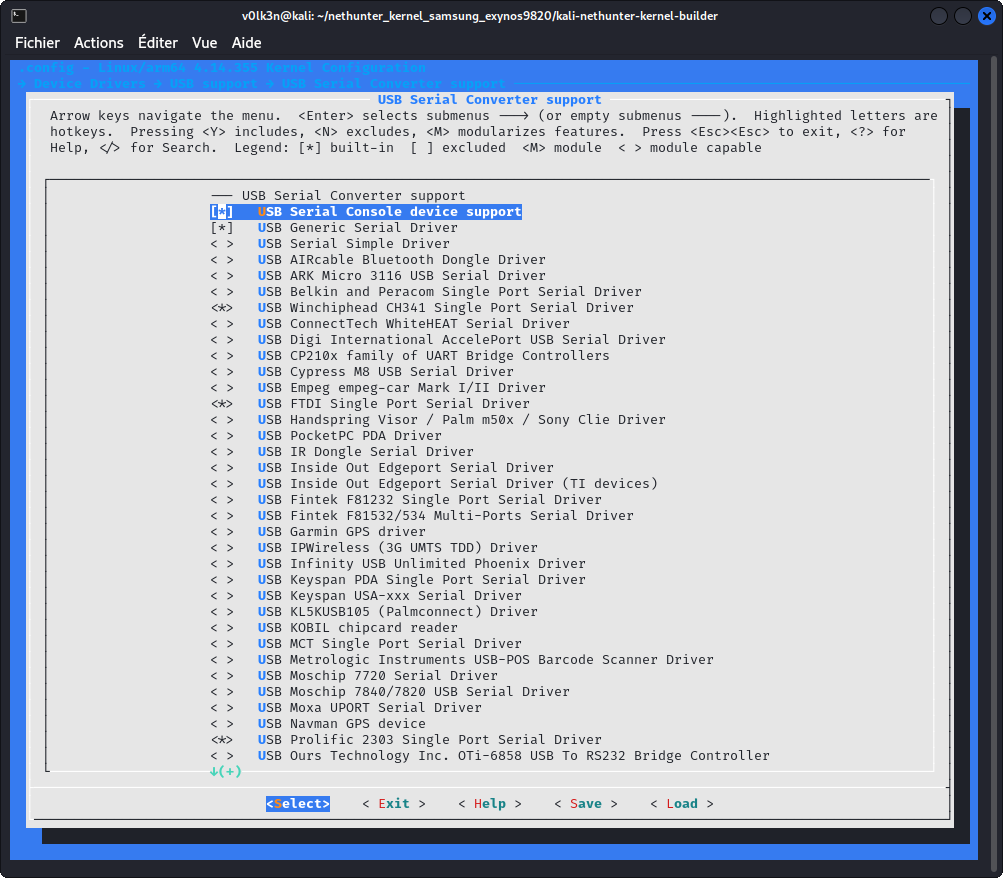
In section “Device Drivers —> USB support —> USB Serial Converter support —>” :
- Select “USB Serial Console device support”
- Select “USB Generic Serial Driver”
- Select “USB Winchiphead CH341 Single Port Serial Driver”
- Select “USB FTDI Single Port Serial Driver”
- Select “USB Prolific 2303 Single Port Serial Driver”
Hlcan driver
This would be used to get the chinese CAN Analyzer USB working with can-utils suite.
Go to your kernel sources folder and clone as submodule can-isotp driver.
git submodule add https://github.com/V0lk3n/usb-can-2-module drivers/net/can/usb-can-2-module
Edit drivers/net/can/Kconfig and add the following line :
source "drivers/net/can/usb-can-2-module/Kconfig"
Edit drivers/net/can/Makefile and add the following line :
obj-y += usb-can-2-module/
In Section “Networking Support”
Under “CAN bus subsystem support —> CAN Device Drivers”
- Select as Module “hlcan module for usb-can”
ISO 15765-2 Driver CAN-ISOTP (Optional)
Go to your kernel sources folder and clone as submodule can-isotp driver.
git submodule add https://github.com/V0lk3n/can-isotp drivers/net/can/can-isotp
Download “isotp.h” to “include/uapi/linux/can”
cd include/uapi/linux/can
wget https://raw.githubusercontent.com/v0lk3n/can-isotp/refs/heads/master/include/uapi/linux/can/isotp.h
Edit drivers/net/can/Kconfig and add the following line :
source "drivers/net/can/can-isotp/Kconfig"
Edit drivers/net/can/Makefile and add the following line :
obj-y += can-isotp/
In Section “Networking Support”
Under “CAN bus subsystem support —> CAN Device Drivers”
- Select as Module “CAN ISO 15765-2 driver”
ELM327 (Optional)
This driver should be build as module! To get the ability to load it using sudo insmod elmcan.ko accept_flaky_uart=1 if needed.
Kernel 6.0 or Higher
This driver has become an official part of Linux since v6.0
In Section “Networking support”
Under ” > CAN bus subsystem support > CAN Device Drivers —>”
- Select as module (<M>) Serial / USB serial ELM327 based OBD-II Interfaces (can327)
Kernel 4.11 or Higher
For Kernel 4.11 or higher. You can add ELM327 driver by following these step :
- Go to root of your Kernel repository and run these commands
git submodule add https://github.com/V0lk3n/elmcan drivers/net/can/elmcan
cp drivers/net/can/elmcan/can327.c drivers/net/can/
- Edit drivers/net/can/Makefile and add the following line.
obj-$(CONFIG_CAN_CAN327) += can327.o
- Edit drivers/net/can/Kconfig and add the following config.
config CAN_CAN327
	tristate "Serial / USB serial ELM327 based OBD-II Interfaces (can327)"
	depends on TTY
	select CAN_RX_OFFLOAD
	help
	  CAN driver for several 'low cost' OBD-II interfaces based on the
	  ELM327 OBD-II interpreter chip.

	  This is a best effort driver - the ELM327 interface was never
	  designed to be used as a standalone CAN interface. However, it can
	  still be used for simple request-response protocols (such as OBD II),
	  and to monitor broadcast messages on a bus (such as in a vehicle).

	  Please refer to the documentation for information on how to use it:
	  Documentation/networking/device_drivers/can/can327.rst

	  If this driver is built as a module, it will be called can327.
Finally, build the kernel.
In Section “Networking support”
Under “CAN bus subsystem support > CAN Device Drivers —>
- Select as module (<M>) Serial / USB serial ELM327 based OBD-II Interfaces (can327)
Kernel Lower than 4.11
For Kernel lower than 4.11. You can add ELM327 driver by following these step :
- Go to root of your Kernel repository and run these commands
git submodule add -b linux-pre-4.11 https://github.com/V0lk3n/elmcan drivers/net/can/elmcan
- Edit drivers/net/can/Makefile and add the following line.
obj-y += elmcan/
Finally, build the kernel.
In Section “Networking support”
Under “CAN bus subsystem support > CAN Device Drivers —>
- Select as module (<M>) Serial / Serial ELM327 driver
CAN Arsenal - Documentation
Warning : Actually in Experimental Version
Menu
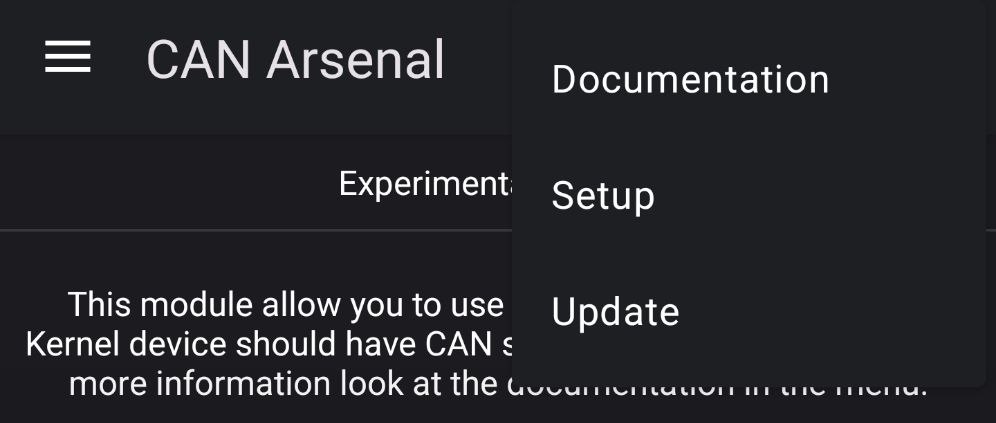
Documentation
This button will redirect to the following documentation.
Setup
This button will install needed CAN tools and packages. Note that it shouldn’t be needed as it should be launched at first run of CAN Arsenal.
Update
This button will update the installed CAN tools and packages.
Settings
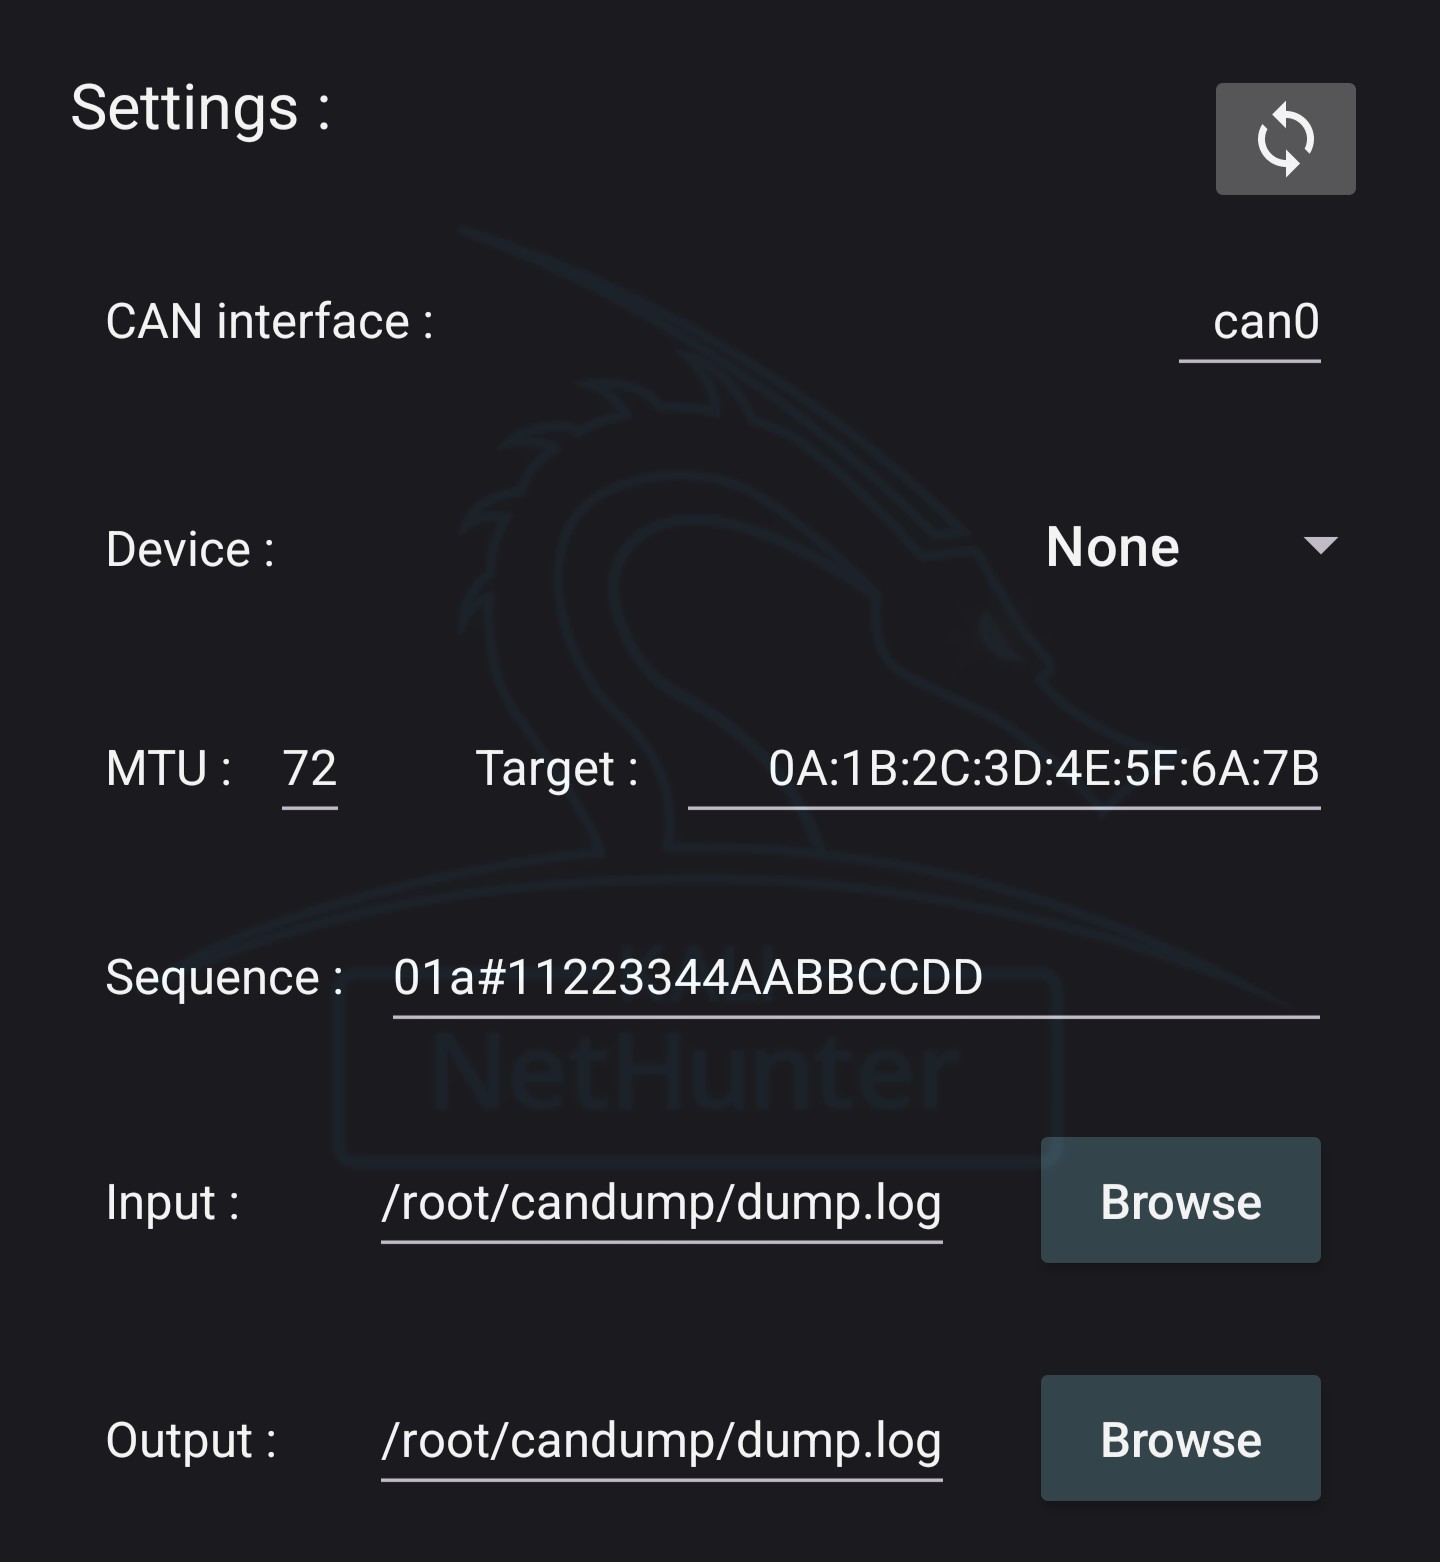
Settings are used to configure CAN Arsenal toolset.
Interface
Interface section is used to Configure your CAN interfaces.
ldattach
Attach your device. Set as default for /dev/rfcomm0 (Bluetooth)
ldattach - Used command :
You may modify this as your wish.
ldattach --debug --speed 38400 --eightbits --noparity --onestopbit --iflag -ICRNL,INLCR,-IXOFF 29 /dev/rfcomm0
slcand
Daemon for Serial CAN devices.
slcand - Used command :
You may modify this as your wish.
slcand -s6 -t sw -S 200000 /dev/ttyUSB0 can0
slcan_attach
Attach your serial CAN device.
slcan_attach - Used command :
slcan_attach -s6 -o /dev/ttyUSB0
RFCOMM bind
For bluetooth CAN adapter usage. Run it to bind bluetooth to your device.
Bind RFCOMM - Settings Prerequisite :
Set “Target” MAC address in Settings.
Note : RFCOMM should be supported, you need to enable services in bluetooth arsenal prior this to work. Pair and Trust your bluetooth device with bluetoothctl prior using this.
Bind RFCOMM - Used command :
rfcomm bind <Target MAC Address>
socketcand
Daemon to bridge CAN interfaces.
socketcand - Settings Prerequisite :
Set “CAN Inteface” in Settings.
socketcand - Used command :
socketcand -v -l wlan0 -i <CAN Interface>
CAN Interfaces
Note : Actually you only may start one interface at a time. Will be rewritten for next release. If you need to start more than one, you will need to start these manually.
Start CAN Interface - Settings Prerequisite :
Set “CAN Interface”, “MTU” in Settings and “CAN Type” in Inteface.
If you use adapter for CAN or SLCAN interfaces, you may need to setup “ldattach”,”slcand”,”slcan_attach”,”rfcomm bind” or “socketcand”
Start CAN Interface - Used command :
If CAN Type is set to : CAN
sudo ip link set <CAN Interface> bitrate <Selected Bitrate>
sudo ip link set <CAN Interface> mtu <MTU>
sudo ip link set <CAN Interface> up
If CAN Type is set to : VCAN
sudo ip link add dev <CAN Interface> type vcan
sudo ip link set <CAN Interface> mtu <MTU>
sudo ip link set <CAN Interface> up
If CAN Type is set to : SLCAN
sudo ip link set <CAN Interface> mtu <MTU>
sudo ip link set <CAN Interface> up
Stop CAN Interface - Settings Prerequisite :
Set “CAN Interface” in Settings
Stop CAN Interface - Used command :
If CAN Type is set to : CAN or SLCAN
sudo ip link set <CAN Interface> down
If CAN Type is set to : VCAN
sudo ip link set <CAN Interface> down && sudo ip link delete <CAN Interface>
Tools
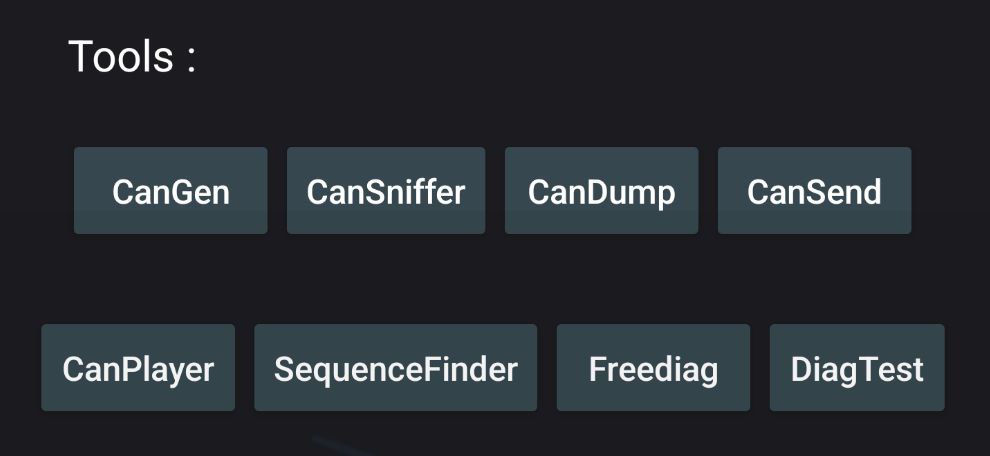
Can-Utils : CanGen
Used to generate CAN Bus Traffic.
CanGen - Settings Prerequisite :
Your desired CAN Interface should be started and set in Settings.
CanGen - Used command :
cangen <CAN Interface> -v
Can-Utils : CanSniffer
Used to sniff CAN Bus Traffic.
CanSniffer - Settings Prerequisite :
Your desired CAN Interface should be started and set in Settings.
CanSniffer - Used command :
cansniffer <CAN Interface>
Can-Utils : CanDump
Used to dump CAN Bus traffic to an output file.
CanDump - Settings Prerequisite :
Your desired CAN Interface should be started and set with “Output” path in Settings.
CanDump - Used command :
candump <CAN Inteface> -f <Output Log>
Can-Utils : CanSend
Used to replay a specific sequence to CAN bus.
CanSend - Settings Prerequisite :
Your desired CAN Interface should be started and set with “Sequence” in Settings.
CanSend - Used command :
cansend <CAN Interface> <Sequence>
Can-Utils : CanPlayer
Used to replay dumped sequences from a log file to CAN bus.
CanPlayer - Settings Prerequisite :
Your desired CAN Interface should be started and set with “Input” path in Settings.
CAN Interface will be taken from the Input Log, check that your interface is the same one. (If you dump with vcan0, you should replay with vcan0)
CanPlayer - Used command :
canplayer -I <Input Log>
Custom Script : SequenceFinder
You can see the source code here.
Used to find the exact sequence of the desired action from a log file.
This custom script will auto split a log files using head and tail. Replay theses with user input in loop using CanPlayer, until finding the exact sequence of the desired action. Finally it replay it using CanSend.
SequenceFinder - Settings Prerequisite :
Your desired CAN Interface should be started and set with “Input” path in Settings.
CAN Interface will be taken from the Input Log, check that your interface is the same one. (If you dump with vcan0, you should replay with vcan0)
SequenceFinder - Used command :
/opt/car_hacking/sequence_finder.sh <Input Log>
Freediag
Used to diagnose your car.
Freediag - Used command :
sudo -u kali freediag
Freediag : DiagTest
DiagTest is a standalone program from Freediag, used to exercise code paths.
DiagTest - Used command :
sudo -u kali diag_test
USB-CAN
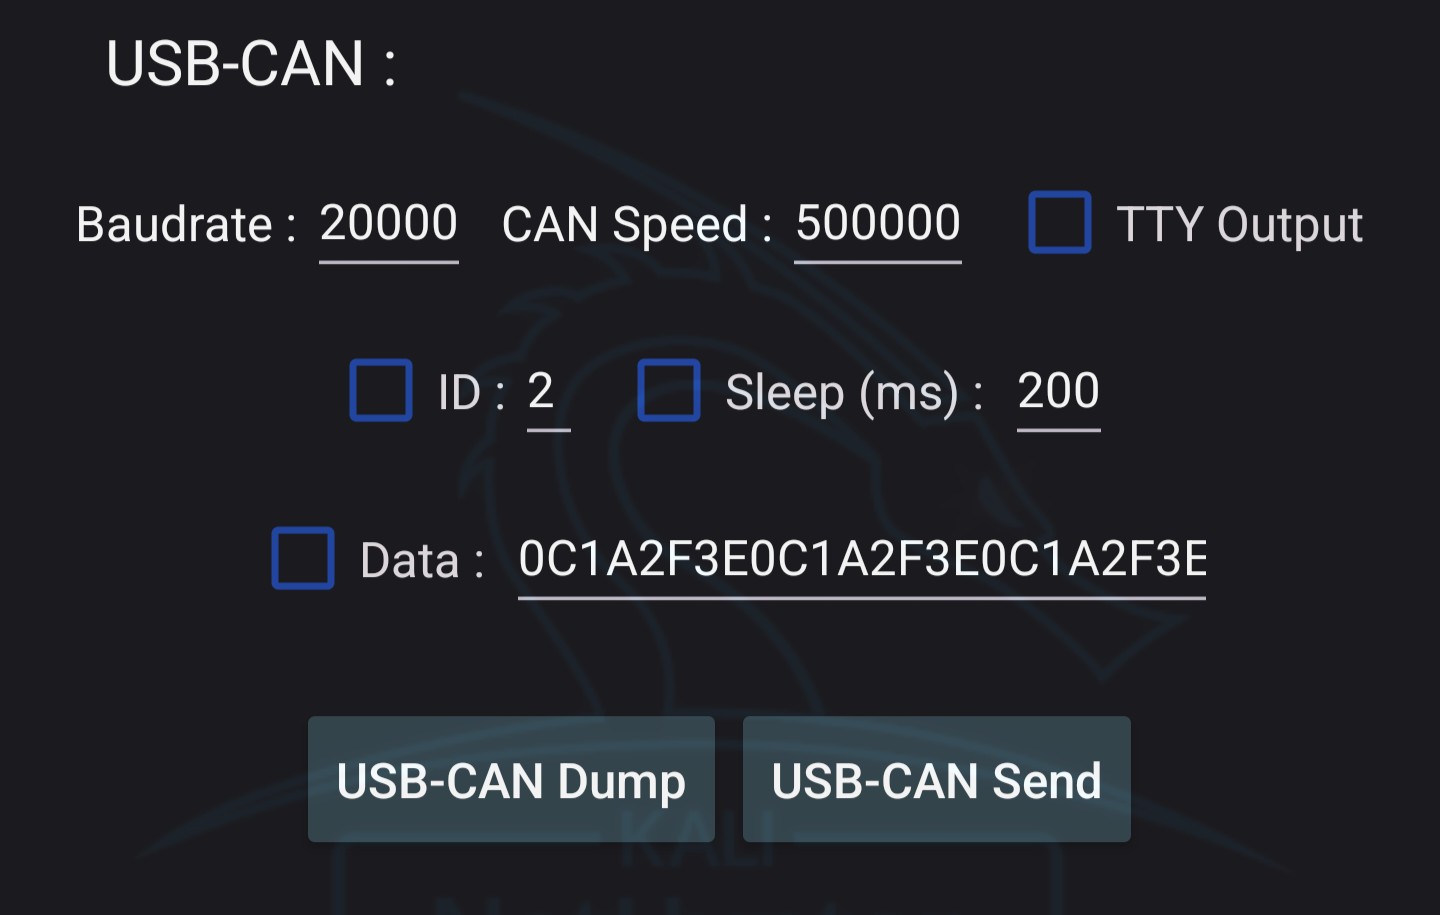
Mainly used to Dump and Send sequence using CAN USB Analyser.
USB-CAN Dump - Settings Prerequisite :
Set “USB Device” in Settings.
In USB-CAN, set “CAN Speed” and “Baudrate”. Optionally add debug parameter.
CAN USB Adapter should be plugged in your device and hit refresh button to set USB Device with you’r plugged adapter.
USB-CAN Dump - Used command :
canusb -d <USB Device> -s <USB CAN Speed> -b <USB Baudrate> <Optional Debug Parameters>
USB-CAN Send - Settings Prerequisite :
Set “USB Device” in Settings.
In USB-CAN, set “CAN Speed” and “Baudrate”. Set “ID” and “Data” as what you want to send to CAN bus. Optionally add debug and sleep parameter.
CAN USB Adapter should be plugged in your device and hit refresh button to set USB Device with you’r plugged adapter.
USB-CAN Send - Used command :
canusb -d <USB Device> -s <USB CAN Speed> -b <USB Baudrate> <ID> <Data> <Optional Debug/Sleep Parameters>
Cannelloni
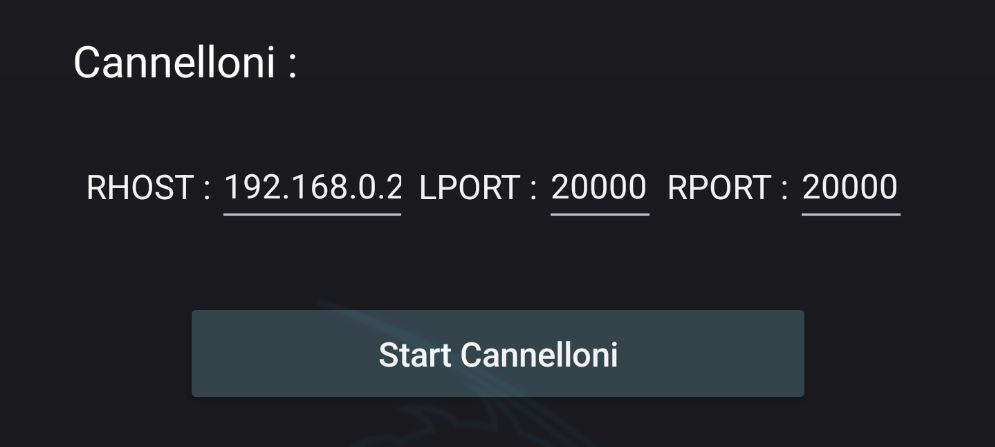
Used to communicate with two machine on a CAN bus by Ethernet.
Cannelloni - Settings Prerequisite :
Your desired CAN Interface should be set in Settings.
In Cannelloni, “RHOST”, “RPORT” and “LPORT” need to be set.
Both device should be linked using an Ethernet Cable.
Cannelloni - Used command :
sudo cannelloni -I <CAN Interface> -R <RHOST> -r <RPORT> -l <LPORT>
Logging
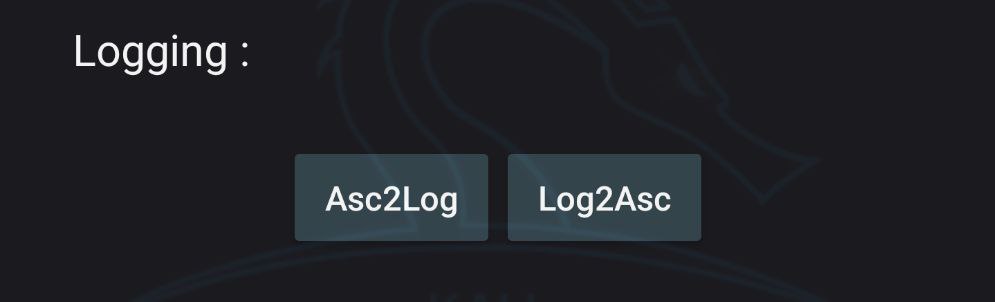
Asc2Log
From can-utils suite, Asc2Log is used to convert ASC file format to the classic LOG.
Asc2Log - Settings Prerequisite :
Set “Input” and “Output” path in Settings.
Asc2Log - Used command :
asc2log -I <Input Log> -O <Output File>
Log2Asc
From can-utils suite, Log2Asc is used to convert dumped LOG file to the ASC format.
Log2Asc - Settings Prerequisite :
Your desired CAN Interface should be started and set with “Input”, “Output” path in Settings.
Log2Asc - Used command :
log2asc -I <Input Log> -O <Output File> <CAN Interface>
Custom Command
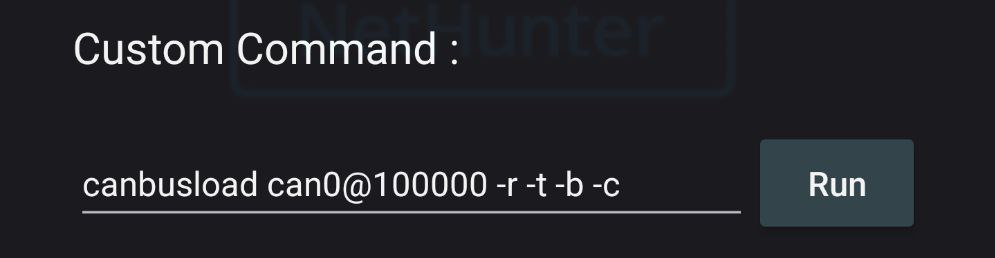
Used in case you need to run a specific command which doesnt match the one provided.
Resources
Tools Documentations
Guide